| 일 | 월 | 화 | 수 | 목 | 금 | 토 |
|---|---|---|---|---|---|---|
| 1 | 2 | 3 | 4 | 5 | 6 | |
| 7 | 8 | 9 | 10 | 11 | 12 | 13 |
| 14 | 15 | 16 | 17 | 18 | 19 | 20 |
| 21 | 22 | 23 | 24 | 25 | 26 | 27 |
| 28 | 29 | 30 | 31 |
- 자료구조
- Express
- MongoDB
- 웹기초
- bootstrap
- 그래프
- 웹개발
- 이진탐색트리
- mongoose
- nodeJS
- 웹해킹
- GIT
- node.js
- 포렌식
- 워게임추천
- materialize
- 워게임
- 이진트리
- node
- 자바기초
- CTF
- 자바문제풀이
- 뷰
- 포렌식워게임
- 써니나타스
- 웹해킹기초
- NavBar
- gitbash
- wargame.kr
- 자바
- Today
- Total
보안 전공생의 공부
주소록 만들기 / bootstrap, static 파일 서비스+경로 규칙 본문
· bootstrap : 빠르고 간편한 html, css, js 프레임워크
https://getbootstrap.com/docs/4.1/getting-started/introduction/
Introduction
Get started with Bootstrap, the world’s most popular framework for building responsive, mobile-first sites, with BootstrapCDN and a template starter page.
getbootstrap.com
위 bootstrap 공식 사이트에서 제공하는 방법으로 bootstrap을 설정한다.
<!-- views/partials/head.ejs -->

<meta name="viewport" content="width=device-width,initial-scale=1">

<!-- jquery & bootstrap -->
<link rel="stylesheet" href="https://stackpath.bootstrapcdn.com/bootstrap/4.1.3/css/bootstrap.min.css" integrity="sha384-MCw98/SFnGE8fJT3GXwEOngsV7Zt27NXFoaoApmYm81iuXoPkFOJwJ8ERdknLPMO" crossorigin="anonymous">
<script src="https://code.jquery.com/jquery-3.3.1.slim.min.js" integrity="sha384-q8i/X+965DzO0rT7abK41JStQIAqVgRVzpbzo5smXKp4YfRvH+8abtTE1Pi6jizo" crossorigin="anonymous"></script>
<script src="https://cdnjs.cloudflare.com/ajax/libs/popper.js/1.14.3/umd/popper.min.js" integrity="sha384-ZMP7rVo3mIykV+2+9J3UJ46jBk0WLaUAdn689aCwoqbBJiSnjAK/l8WvCWPIPm49" crossorigin="anonymous"></script>
<script src="https://stackpath.bootstrapcdn.com/bootstrap/4.1.3/js/bootstrap.min.js" integrity="sha384-ChfqqxuZUCnJSK3+MXmPNIyE6ZbWh2IMqE241rYiqJxyMiZ6OW/JmZQ5stwEULTy" crossorigin="anonymous"></script>

<!-- my css -->
<link rel="stylesheet" href="/css/master.css">

<title>My Website</title>viewport는 display상에서 웹페이지가 보여지는 영역이다.
데스크탑 viewport는 사용자가 브라우저 창의 크기를 조정하면서 함께 크기가 조절된다.
- 창의 크기를 줄이면 스크롤을 해야 웹페이지의 전체 내용을 확인할 수 있는 경우
모바일 viewport는 일반적으로 브라우저 창의 크기를 변경할 수 없기 때문에
고정된 크기를 가진 웹페이지를 모바일 viewport으로는 전체 내용을 확인할 수 없다.
그래서 스크롤 하거나 더블탭, 줌아웃, 줌인을 통해 viewport의 배율을 변경하여야 한다.
따라서 viewport를 설정하여 다양한 모바일 기기에서도 페이지의 너비나 화면 배율을 설정하여
사용자가 모바일로 웹 페이지를 이동할 때 편하게 이용할 수 있도록(모바일 친화적) 하여야 한다.
( 참조·출처 : https://offbyone.tistory.com/110, https://jw910911.tistory.com/24 )
<meta name="viewport" content="width=device-width,initial-scale=1">
- width=device-width : 브라우저의 너비를 모바일 기기의 width로 지정
- initial-scale=1 : 1==100%로, 사이트의 줌을 변경X를 의미
※ 내 css파일(여기서는 matster.css)는 다른 라이브러리의 css파일(여기서는 bootstrap.min.js) 뒤에 두어야 함
css는 파일간의 충돌이 있는 경우 뒤에 호출된 스타일 효과를 우선시 하기 때문
<!-- views/partials/nav.ejs -->

<nav class="navbar navbar-expand-sm navbar-light bg-light mb-3">
  <div class="container">
    <div class="navbar-brand">
      <img src="img/icon.png" width="30" height="30" class="d-inline-block align-top" alt="">
      Suin's website
    </div>
    <button class="navbar-toggler" type="button" data-toggle="collapse" data-target="#navbarSupportedContent" aria-controls="navbarSupportedContent" aria-expanded="false" aria-label="Toggle navigation">
      <span class="navbar-toggler-icon"></span>
    </button>
    <div class="collapse navbar-collapse" id="navbarSupportedContent">
      <ul class="navbar-nav">
        <li class="nav-item"><a href="/contacts" class="nav-link">Index</a></li>
        <li class="nav-item"><a href="/contacts/new" class="nav-link">New</a></li>
      </ul>
    </div>
  </div>
</nav>
bootstrap에서 기본으로 제공해주는 기본메뉴바 코드에 몇가지를 추가한 코드이다.
· navbar(메뉴바) : bootstrap navbar을 알리는 class
· navbar-brand : 사이트 제목 넣는 class
· container : 꼭 필요한 class는 아니지만, navbar 내용을 페이지 중앙에 배치하기 위해 사용
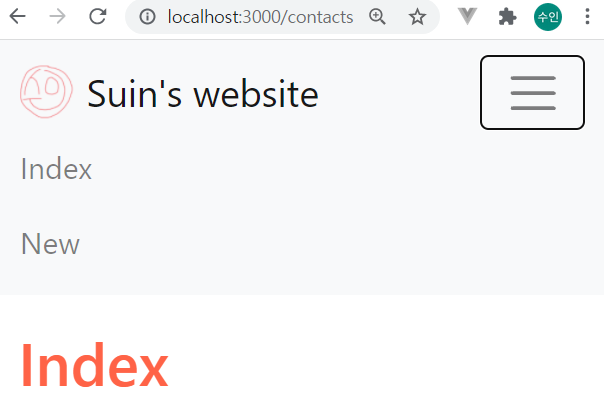
· navbar-toggler : 화면너비가 좁을 때 메뉴를 숨기고 보여주는 버튼(hamburger button) class
data-target에 적용될 id를 삽입
화면너비가 넓으면 숨겨지고, 화면너비가 좁으면 표시됨
· collapse : navbar-toggler class의 대상이 되는 class.
화면너비가 넓으면 표시되고, 화면너비가 좁으면 숨겨짐
· navbar-nav : 실제 메뉴들을 가지는 class
· nav-item : 개별 메뉴들을 가지는 class
- navbar 세부내용 : https://getbootstrap.com/docs/4.1/components/navbar/
views/contacts 에 있는 ejs 파일들도 수정을해야한다.
<!-- edit.ejs -->

<html>
  <head>
    <%- include('../partials/head') %>
  </head>
  <body>
    <%- include('../partials/nav') %>

    <div class="container contact contact-edit">
      <h2>Edit</h2>
      <form class="contact-form" action="/contacts/<%= contact._id %>?_method=put" method="post">
        <div class="form-group">
          <label for="name">Name</label>
          <input type="text" id="name" name="name" value="<%= contact.name %>" class="form-control">
        </div>
        <div class="form-group">
          <label for="email">Email</label>
          <input type="text" id="email" name="email" value="<%= contact.email %>" class="form-control">
        </div>
        <div class="form-group">
          <label for="phone">Phone</label>
          <input type="text" id="phone" name="phone" value="<%= contact.phone %>" class="form-control">
        </div>
        <div>
          <button type="submit" class="btn btn-primary">Submit</button>
        </div>
      </div>
    </form>
  </body>
</html>
<!-- index.ejs -->
<html>
<head>
<%- include('../partials/head') %>
</head>
<body>
<%- include('../partials/nav') %>
<div class="container contact contact-index">
<h2>Index</h2>
<ul class="list-group">
<% contacts.forEach(function(contact) { %>
<li class="list-group-item">
<a href="/contacts/<%= contact._id %>"><%= contact.name %></a>
</li>
<% }) %>
</ul>
</div>
</body>
</html><!-- new.ejs -->
<html>
<head>
<%- include('../partials/head') %>
</head>
<body>
<%- include('../partials/nav') %>
<div class="container contact contact-new">
<h2>New</h2>
<form class="cotact-form" action="/contacts" method="post">
<div class="form-group">
<label for="name">Name</label>
<input type="text" id="name" name="name" value="" class="form-control">
</div>
<div class="form-group">
<label for="email">Email</label>
<input type="text" id="email" name="email" value="" class="form-control">
</div>
<div class="form-group">
<label for="phone">Phone</label>
<input type="text" id="phone" name="phone" value="" class="form-control">
</div>
<div>
<button type="submit" class="btn btn-primary">Submit</button>
</div>
</form>
</div>
</body>
</html><!-- show.ejs -->
<html>
<head>
<%- include('../partials/head') %>
</head>
<body>
<%- include('../partials/nav') %>
<div class="container contact contact-show">
<h2>Show</h2>
<div class="card">
<div class="card-body">
<h3 class="card-title"><%= contact.name%></h3>
<label>Email</label><span><%= contact.email %></span>
<br>
<label>Phone</label><span><%= contact.phone %></span>
</div>
</div>
<div class="contact-menu mt-2">
<a href="/contacts/<%= contact._id %>/edit" class="btn btn-light mr-2">Edit</a>
<form action="/contacts/<%= contact._id %>?_method=delete" method="post">
<a href="#" class="btn btn-light" onclick="confirm('Do you want to delete this?')?this.parentElement.submit():null;">Delete</a>
</form>
</div>
</div>
</body>
</html>
<실행결과>


<정적파일 사용하기>
img 폴더에 있는 icon.png 파일을 navbar-brand 태그 안에 사용하려고 하는데
처음에는 이미지파일의 경로를 찾을 수 없었다.

이미지 경로를 위의 경로 이외에도 다양한 경로로 img 폴더로 접근하려 했지만 되지 않았다.
404 error가 계속 떴다.

**짱개발자 민서님**의 지혜를 얻어 해결했다.
// index.js
app.use(express.static(__dirname+'/public'));
이 설정되어 있던 걸 잊고 있었다.
정적파일은 public폴더 밑으로 업로드했어야 했던 것이다.

img 폴더를 public 폴더 밑으로 옮기고
nav.ejs에서 img src를 수정하고나서

icon.png 파일에 접근이 가능해졌다.


근데 contacts에서 다른 페이지로 redirect (contatcts/, contacts/new , contacts/edit 등)하면
다시 public 폴더가 접근이 안된다 ㅠ
해결되면 다시 업로드 하겠다악 ㅠㅠㅠㅠㅠㅠㅠㅠ
+ 경로 문제였다
기존의 img 경로를 img/icon.png로 설정하였는데 제일 앞에 /를 붙였어야 했다.
/는 루트디렉토리를 의미한다.
- img/icon.png : 루트 디렉토리 밑에 있는 img 디렉토리 밑의 icon.png 파일에 접근
- /img/icon.png : 현재 디렉토리 밑에 있는 img 디렉토리 밑의 icon.png 파일에 접근

img src="/img/icon.png"로 변경 후

참조 : http://www.ith.kr/chair/wh/wh1003.html
IT문화원 강좌: 10.3.1.경로(Path) 표시 방법과 경로 디렉토리 구분 기호 /
10.3.1.경로(Path) 표시 방법과 경로 디렉토리 구분 기호 / 10.3.경로(Path)의 의미와 경로 활용 10.3.1.경로(Path) 표시 방법과 경로 디렉토리 구분 기호 / 경로는 파일의 위치를 알려주는 주소입니다. 가
www.ith.kr
'WEB > Node' 카테고리의 다른 글
| 게시판 만들기 / front end + scope + breadcrumb +bootstrap grid (0) | 2021.10.19 |
|---|---|
| 게시판 만들기 / back end + mongoose 정리 (0) | 2021.10.18 |
| 주소록 만들기 / module (0) | 2021.10.14 |
| 주소록 만들기 / show, edit, update, destroy (0) | 2021.10.07 |
| 주소록 만들기 / index, new, create (0) | 2021.10.07 |


